Friday, August 26, 2011

A Giveaway You Should Know About

Denise over at Stonewall Craftique is just getting started with her blog 
and she is having her first ever giveaway.  It's going to be a good one!  
She is starting with this awesome pumpkin she made from a recycled fabric sample.  
She will be adding to her giveaway as new things come in to her shop.  
I hope you'll head over and check out Denise's blog today!

I am off to school to work on my classroom again as soon as I can get a few loads of laundry on the line.  I hope you are all having a good Friday and looking head to a fun weekend.  It's hard to believe it's one of the last of the summer.  
Prayers to everyone in the path of Hurricane Irene.  I keep hoping that it will not be as bad as it is looking right now.  


Monday, August 22, 2011

If procrastination was a career choice, I would be a leader in the field.

So, I've already mentioned a few times that it's time to get going on my classroom at school.  But for some reason this year I am having a little trouble getting it in gear.  I guess I have had a good time crafting lately and I kind of hate to see it come to an end.  Once the school year starts, I usually can't find nearly as much time for home things.  So today when I should have gone into school, I stayed home and finished a stitchery and did a few other things.  Here's what I worked on.  First, I finished a stitchery for myself.  The pattern is one that Kaaren from The Painted Quilt offered as a First Friday Freebie in September 2009.  I think this might even be her very first one.  I made one for my Great Pumpkin Swap partner, and I knew I wanted one for me, too.  Kaaren's pattern was for a wall hanging, but I wanted to try my hand at putting them into barn wood frames.  I really like the way they turned out.  (You can see my partner's here.)  I liked working on these stitcheries for another reason, too.  Kaaren has been experiencing some health challenges so this gave me some time to think positive thoughts and send up prayers for her, and for other friends who have had challenges lately.  I like doing that when I sew.  It's almost like meditating I guess.

Another procrastination project I worked on was trying out Misi's recipe for parched hearth corn.  My results don't look as good as Misi's so I am going to have to mess with this a little more, I think.

When I went in the garage to get the staple gun to put my stitchery in the frame I walked past a garage sale purchase from a year ago.  I think I bought this for $2.00 - definitely not more than 3.  When I bought it, I loved the oil painting.  It is signed, but the name is hard to read.  The year says 1960.  The name looks like Sibyl, and it made me laugh because 20 years ago when I was pregnant with our son, I had a little hormone swinging going on.  (Probably just a fluke, right?) Anyway, my husband used to say to me, "Sibyl, I want to talk to Melissa now."  Funny guy.  He knew I couldn't chase him down in my condition.
Well, I don't really like the frame so it got stuck on a nail in the garage til I could do something with the frame.  I'm thinking about painting it, but now I can't decide what color.  Would love to hear any suggestions anyone has.

Now one last thing.  I've been meaning to share this one for a while.  I bought this doll in a little shop that I wandered into back in the Spring.  I really liked her and when I saw the price tag said only $16 I decided to buy her.  She's really tall - over 30 inches.  And the sampler on her apron says, "At times I did so dread my needle and thread.  Mary's work 1832"  
At the time I thought maybe it was actually a manufactured doll, but after bringing her home and looking her over, I decided that she really was hand made by someone, so now I really can't believe the price.  There's just a couple of problems.  Number one - my family thinks she is creepy.  They don't get the whole no face thing.  Totally weird to them.  And can you spot the second issue?  Look closer at her feet.


If you noticed that her feet go the wrong way, you are correct!  There is a string on the back of her head for hanging her from a peg, but it's actually the front of her!  I need to cut the string and put her clothes on the other way.  Still no face, so the family is still going to be creeped out probably, but at least she'll have a little more dignity.  Perhaps I'll do that for another day's procrastination project.

I'm off to go to dinner with my husband.  It's $1 taco night at the bowling alley a couple towns over.  He loves this!  I will be ordering the chicken finger wrap with ranch dressing on the side.  We both end up costing about the same amount because it takes about 6 of those tacos to fill him up!

Tomorrow I will not have the luxury of goofing off all day (and believe me, I do get it that this is a luxury)!  I have a workshop at a school an hour away so I'll be practicing getting out of the house at my usual time for school.  I don't have any problem getting up early.  (We are usually awake by 4:30.)  But during the summer I don't rush out the door unless I have to.  Play time's over.  Back to the real world. 

I hope the week is off to a good start for everyone.  


Sunday, August 21, 2011

Halloween Hang Tags


Here's one last project I've worked on lately.  I really love vintage postcards.  I went to google and clicked the Images tab up at the top of the screen, then I typed "free vintage halloween postcards".  There are lots of images that you can work with.  I saved some of them to my computer and then inserted them into a Word document and resized them to the size I wanted.  
After I coffee stained my hang tags I put the postcard images on them.  I have a xyron sticker maker machine that I have found many uses for, both at home and at school. It makes it really easy to put the pictures onto the hang tags.  I bought mine at Walmart.  
Here's a little Halloween tree that I already had from a clearance sale at Joann's a few years ago.  I used the little hang tags for decorations.  I can't decide how I actually want to hang them from the tree, so that's why the strings are dangling down like they are for now.

Here are some larger hang tags I made.  I am going to make a pennant banner with them.  Still deciding what else I want to put on it to go with the hang tags.  
I think these also make fun package tie ons.  I have a few little trick or treat friends that usually get a special treat bag.  I think I'll make some of these for name tags on their bags.


It's that time of year for me to work in my classroom getting it ready to start the new school year with a new class, so I won't have as much time for blogging for a while.  I do have a table topper pattern to hopefully share sometime soon.  I'm working on writing the directions for it, and will share it as soon as I have that done.

Thanks for peeking in at the projects my sister and I worked on while she was home from Missouri.  I hope if you give any of them a try you'll share pictures!

Melissa

Saturday, August 20, 2011

Wooden CD Crate make-overs


I'm not sure how long ago I bought a couple of CD crates (from Michaels or Joanns I think), but they have been kicking around my craft shelf for a while now.  Libby and I painted them two different colors, then painted the slats on one side with chalkboard paint.  I think I am really going to enjoy finding other ways to use that chalkboard paint - I really liked how it turned out.

We started with the unfinished crate.

Libby painted her base coat of red, and I painted my base coat of a brownish color.  We used the folkart paint from Walmart.
  
We let those dry for several hours, then we each painted a different color.  Libby used black and I used a darker beige.  (If you really want the actual colors, leave a comment and I will look for you.)
We left them to dry overnight (maybe even two), and then we sanded so that the corners and sides looked worn to our liking.  Sorry, but I must not have taken pictures of these steps.  
After we sanded we taped the two slats where we planned to paint the chalkboard paint so that just the spot where we wanted the chalkboard paint showed.  Here's a picture of mine after I took the tape off and Libby's with the tape still on.  I hope this gives you at least an idea of how that step went.

Here's what they looked like after we took the tape off.


Now we get to the part where I did my usual lack of planning.  I meant to add a rub of walnut gel stain to the box before I put the chalkboard paint on, but I forgot or got distracted (oh look, there's a chicken!).
So I taped over the the chalkboard strips and stained yesterday.  I loved the effect!  However, when I took the tape off the chalkboard sections I found that I had overlapped onto the paint section which left a little bit of lighter unstained wood showing.  I retaped and tried again.  Not perfect, but I still really like it.
I think it's going to be fun to change the message on the side when the mood strikes.


Friday didn't go as planned here.  My son called in distress about his apartment situation.  This is the second apartment he's moved into since the first of July.    The poor kid has been trying so hard to be all grown up and independent about his apartment selection, but this situation required parental intervention.  Two bizarre apartment situations in one summer is the limit, I think. So Mark went to his rescue and moved him into apartment #3.  Third time is the charm, right?!  Here's hoping anyway. ;)

I hope you are all getting your weekends off to a good start.  A baby shower today and a bridal shower tomorrow for me.  And the continued de-cluttering of my life.... should be a good weekend. :)


Friday, August 19, 2011

Making Soup Can Bouquets

Another project we did while Libby was home...


First I spray painted the cans with this:


I pounded stakes into the ground and put the cans on top of them.
I wonder what the neighbors think when I do this stuff?
 Then we each had our own idea about what we wanted to do.  Libby and I used postcards or labels we found online or in my Print Shop software for ours.  We tried out a variety of sizes.  We also tried a couple of ways to put the labels on the cans.  When I printed them the first time, I used card stock which was too thick for staying stuck on with just the xyron sticker stuff I had.  So we got out the Mod Podge and painted the back of the label and then painted over the front after we got it stuck down.  Then I printed some on regular paper and those stayed on with just the xyron stuff.

Chele ended up using a can that wasn't spray painted and we covered it with fabric.  The little border she had picked out didn't go all the way around so I sewed a little strip to each side of it, then we slipped it over the can.  She went with a Halloween theme for the things she put in her bouquet.


Libby likes to decorate year round with a patriotic theme, so she made her can one she can use for that.

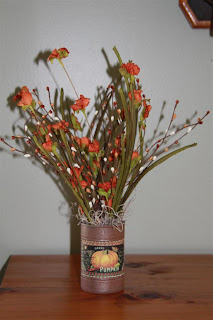
I wanted a Fall theme, so I put a pumpkin label on mine and put in some mostly orange flowers and berries.

I liked it so well that I made another one for my swap partner, Marilyn.  I made the label bigger for this one.  


We had a fun time creating our soup can bouquets.  They were fairly quick and not very expensive.  The cans are a recycle item (love that!), the labels were all free except for the printing.  The florals were from Stonewall Craftique and because the cans are fairly small, it doesn't take much to fill them.  (Be sure to check out Denise's Stonewall Craftique blog - she shares awesome recipes and great decorating tips!)  We also put that floral foam stuff in the can.  I had some of that left over from another time, and it didn't take much to fill these little cans.  
It was a fun project with lots of possibilities for any time of year.

I am off to work on cleaning and organizing my sewing room.  I had just started before Libby came home, and now it's time to get serious! I really want it in order before school starts.  

This afternoon I am signed up to "watch" the school work at the fair.  I've never had trouble with vandals before so it's pretty low pressure - and there's usually kettle corn nearby so win, win. :)

I hope you have a great day in your neck of the woods!
Melissa


Thursday, August 18, 2011

Candy Corn Ornie Tutorial

Here is a tutorial for the candy corn ornies I included in my giveaway and swap packages.  


Candy Corn Ornies
You will need:
·       Orange, white and yellow fabric cut in strips.  The chart shows the sizes I used. 
·       A pattern or ruler in the shape of a candy corn.  (I used a 45° triangle ruler)

large
medium
small
white fabric strips
1 ¾ in.
1 ½ in.
1 ¼ in.
orange fabric strips
4 ¼ in.
3 in.
2 in.
yellow fabric strips
3 in.
2 ¼  in.
1 ¾ in.


Sew the white, orange and yellow strips together in candy corn order (or not).   

I used a 45° triangle ruler to cut my candy corn shapes.  I folded the fabric in half and cut the two sides of the candy corn at once. 

Put the two pieces right sides together and stitch around the triangle, rounding off the points as you sew.  You could trim the points first, but I didn’t do it that way.
When you sew, start in the orange strip just before the seam with the yellow and back-stitch a little. Then sew all around the candy corn and stop in the orange strip just after the seam with the white strip, back-stitching again.  When I didn't do that the seams came apart between the colored strips when I turned the candy corn right side out for stuffing.

Stuff the candy corn to your liking – I found it best to start with the corners.  It’s tricky to get them to stay stuffed for some reason.  Then sew up the side seam.

Whip up a batch of grunge mix (you can find the recipe I use here) and paint it on, then dry it, either in the oven at about 200 or in the sunshine.  Sand off extra grunge if necessary.

Take two different sizes of candy corn and tie them together with some tea-stained cheese cloth.  I used the large and medium sizes.  Tie on a little hang tag.  I found free vintage postcard images online and resized them for the tag.  (I love my little xyron sticker maker for jobs like this!)
Tie on a little rusty bell and tie the tag to the cheese cloth. 
Voila! A fun Halloween ornie.


I made a few small ornies and put them in a basket for now.

Today we are off to visit our son at his new apartment.  Probably lunch and a little shopping for two showers I have this weekend.  
I hope you take time to do something you enjoy today!  Make it a good one. :)


Wednesday, August 17, 2011

We started with some sunflowers...

One of the first projects we completed while Libby was home was a batch of sunflowers.  We even got Mikey in on the fun.  (Uncle Mark wasn't available for dirt-biking or plane flying or other dirt and mud related jobs, so he was slumming with us... :)

I think the sunflowers really add a nice touch to the laundry, don't you?
Libby (sister), Mikey (nephew), and Chele (sister)
There were complaints about me running a sweat shop at this point.
I think Libby likes making sunflowers. :)
She took kits home for about a dozen more!
Staggering the layers.
Ready for stitching on the center by hand.
There were lots of complaints about this step.
Apparently some of us are having bifocal issues...
When it came time to do the grunging, MIkey didn't want all his petals flattened out,
so his are wrinkly.  Now that's the way Libby and I want to make them!

I keep forgetting to ask if anyone has any use for the fringe that I have been cutting off the bedspreads that I'm using for pumpkins and sunflower centers.  If you could use this for something, leave a comment or send an email.  I hate to throw something away that could be used somehow.


Tuesday, August 16, 2011

My treasures from the Great Pumpkin Swap - a.k.a. Winning the Lottery!

Yesterday was my sister's last day here so it was a busy one.  But I snuck to the post office closest to where I live to mail out my Great Pumpkin swap package to my partner.  Then I drove another mile to the post office where I get my mail.  I couldn't believe it - my swap from Marilyn was already here!  (She just emailed to let me know she mailed it on Saturday!)
Oh my goodness!  When I opened that package my eyes welled up with tears.  I have always wanted to a penny rug, and that is exactly what she made just for me!  She also made 4 autumn coasters and a humbug bag in a quilty design.  On top of that she added a fun jack-o-lantern hanger and a little sewing kit with a pumpkin pin cushion in it.  Fun, fun, fun!  It was like winning the lottery. :)
Here are some pictures of everything:
Here is all my loot in one spot!
I have to get a better picture of that penny rug
so you can  see how beautiful it is!
Coasters (I've never had any wool ones before!),
humbug bag, and sewing kit. :)
I have an idea of a way to use those coasters -
 hopefully I'll have time to do that soon.
Here is where I have my penny rug for now.
I can tell I am going to be moving it around a lot
so I can enjoy it all over my house. :)


I hung the little jack-o-lantern next to my Attic Annie
that I bought from Wendy at Ravenwood Whimzies last year.
Now I have to ask you if you have done a swap and been the first person to get the package and then worry, worry, worry, that your partner likes the things you sent them?!

I will be back sometime soon to show some of the mess fun that Libby and I got into while she was here. :)

Monday, August 8, 2011

And the winner is...

Ronda from Simple Thyme Prims!!  She has won my one year of blogging giveaway!  Ronda, please email me with your mailing address and I'll get your package in the mail ASAP.   :)
I'll be back in a day or so because I think there will be another giveaway this week.   Libby from Splinters from the Woodworkers Wife is accusing me of running a crafting sweat shop, but it might just work to the advantage of a few people out in blog land.
Congratulations to Ronda and a big thank you to everyone who played along.  It's been a fun week for me, and I hope you enjoyed it too.  :)

Sunday, August 7, 2011

Libby is home and it's the last day to sign up for the giveaway!!


Sorry about the lack of post yesterday and for this brief post today.  It's been a bit of a whirlwind here. :)
I do have a couple of additional items that will be falling into the box before I send it off to the lucky winner.  Won't have a picture of these items until later.  But I can tell you that I want some of my own. :)
Because I am posting so late today I will extend sign-ups until noon tomorrow.  If you haven't signed up yet you need to go leave a comment here.

Libby will be picking the winner some time after noon tomorrow, so if you haven't signed up be sure to do it before then!

Thursday, August 4, 2011

Day 5 - A different kind of pumpkin...

Well, we've almost made it to the end of this progressive giveaway.  Only a day or two left to go!  Friday's addition is a little pillow I made.  I love this little set of stitchery patterns.  There's one for every month, but the Fall ones are kind of my favorite.  Might have something to do with Fall being my favorite season. :)
Here's the pillow front and back.  I did big stitch hand quilting with pearl cotton.  The picture makes the quilting thread look bright/white, but it's really not.  I sprayed it with aging spray from Primitive Gatherings and I am pretty happy with how it turned out.


So here's the loot so far:

You will need to sign up on the giveaway post in order to win this little collection of Fall fun. You can also still get an extra chance by leaving a comment on my sister's blog, too.  See the giveaway rules to find the link to her blog post.

I said that today there would be a way to get an extra chance to win.  This is all you have to do:  Leave a comment on this post that tells a Fall item that people might include in their decorating, but I haven't included yet.  Every person who leaves a comment will get an extra chance to win the giveaway collection.  

Check out this great giveaway and blog shop!

Karen over at The Barely There Primitive Bear is having a great giveaway.  She is offering lots of chances to win, too.  Here's what she's offering up:

You can get 2 additional chances to win just by taking a look at her blog shop, The Prim Bear's Cupboard, and telling your favorite item.  The hardest part about that is choosing which thing you like best.  She has some really nice offerings there. :)  I hope you go sign up for her giveaway and check out her shop today!

Day Four - How about a little pumpkin?

For the 4th day of my progressive giveaway I'd like to add my first attempt at grunging a stuffed pumpkin.  I am going to make more of these because I really liked how it turned out.  Probably should do it this morning because it should be a great day to dry them in the sun here.  

I won't have much time for visiting blogs today either by the looks.  My son is coming home long enough to pack up the truck to move out and into his first apartment about an hour away from here.  My husband got the chance to help fly a WACO to Minnesota so he's leaving this morning for that adventure..  I am trying not to crumble.  Good thing I have my sister's visit to look forward to! 


You could win the items in the picture by leaving a comment at this post.  Good luck!  Keep watching because there's still more to be added!  Tomorrow there will be a way to get an extra chance to win, so check in if you get a minute.

Have a great day!

Wednesday, August 3, 2011

A little bowl filler for day 3

I am going to be busy all day today so I'm posting early and not even allowing myself a peak at all your beautiful, creative, fun posts.  Nope.  Not a single one.  This is really a challenge for me lately...

For day 3 of my progressive giveaway let's throw in a little bit of bowl filling.  It smells heavenly - pumpkin spice scent. :)  I love those little pumpkins!
If you want to enter this giveaway, you must comment on my giveaway post.  You can get an extra chance at winning by commenting on my sister's post about coming home.  Check my rules for the giveaway to find the link for that.


All of this and more could all be yours,
but you have to enter to win!


I hope you all have a wonderful day!  

Tuesday, August 2, 2011

Let's add a little light to my giveaway today!

I meant to have this posted earlier today, but when I opened up my blog this morning there were so many posts to check out in blog land that I got distracted.  I didn't get through even half of them!  When my husband notices my distractiblity he always says,  "Oh look, there's a chicken!"  (This happens pretty often...)  This was definitely a chicken situation.  Anyway, I'm blaming all you clever people out there for this late post.  You have so many great ideas!
Here is today's addition to my progressive giveaway - a candle clip:
The clip comes with the candle which is on a timer so it
turns on and off automatically each  evening.
The little berry and star ring is also included. 

This is how it looks on a book.  


You can win both of these items, plus a few more things by leaving a comment on my giveaway announcement post,  here.  Be sure to read the rules to find out a way to get an extra chance to win!

Also,  I decided to give an early bird award.  So everyone who signed up when they only saw the first item will be given an extra chance to win.  This includes Linda, Marti, Lecia, Jean, Lynn, Becky Jennifer, Linda, Jessica, Ronda, Rachel, Angela, Lois, Kathy, Denise and Amy.  :)   These were the first 16 entries before I published this post.
You might want to keep watch each day, I might throw in some other ways to get extra chances. :)

 I'm going to be busy finishing up my swap items for The Great Pumpkin Swap that Amy over at Bumble Bee Lane organized.  I want to get my stuff in the mail this week!

Have a great day!

Monday, August 1, 2011

I have been blogging for almost a whole year! It must be time for a Giveaway!

I can't believe that I will have been blogging for a year on August 4th!.  Though I think if we are going to be honest here, we can say that others have been blogging, I've been reading their blogs, and I've been posting sporadically for a year.  But let's not split hairs here. :)
I think it's time for a giveaway to celebrate one year of fun in the blogging world!  This giveaway will also celebrate my sister coming home from Missouri again so it's going to have to be something special!!  Let's call this a progressive giveaway.  Each day or two this week I will post something new that will be added to my giveaway.  We'll build it up until Libby gets home on Sunday so the deadline for entry will be Sunday August 7th.  On Monday August 8th Libby will pick the lucky winner.  August 8th is Libby's birthday so that will make this even more fun for us!

Here are the rules if you'd like to enter this giveaway:
1.  You must live in the United States.  Sorry, Rest of the World, shipping is too expensive.
2.  You must be a follower of my blog.
3.  You must leave a comment on this post before August 8th.
4.  You can get an extra entry if you go to Libby's blog and leave a comment on her I'm going.....HOME!!! post that suggests something she might want to do while she's here for a little over a week.  While you're there, you might want to check out some of her recent posts - she and her husband have been pretty creative lately. :)

The first item in my giveaway will be one of my grunged and wilty sunflower make-dos.

I hope you'll join the fun and enter!